
How to Organize a Small Garden Shed With Clever Space-Saving Solutions
A small garden shed can quickly become overcrowded with shovels, rakes, watering cans, plant pots, and gardening supplies. Finding practical […]
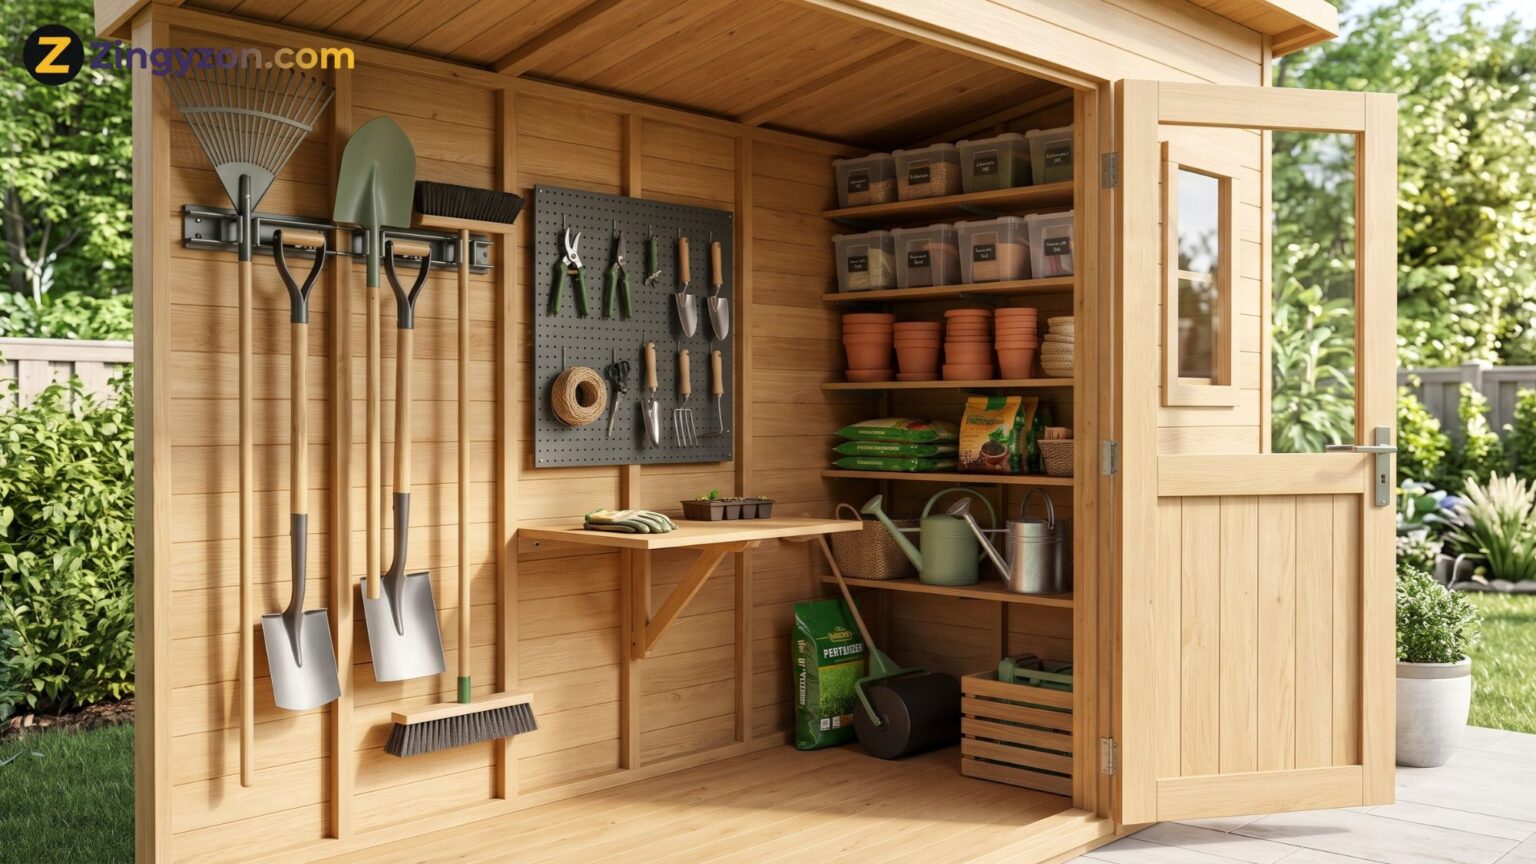
A small garden shed can quickly become overcrowded with shovels, rakes, watering cans, plant pots, and gardening supplies. Finding practical garden tool storage ideas for small sheds can completely transform how you use your available space. With smart organization, vertical storage, and a few affordable improvements, even a compact shed can become a tidy, efficient place where everything has its own position.
The secret is not necessarily purchasing a bigger shed or expensive storage cabinets. Instead, it involves making better use of walls, corners, doors, shelves, and overlooked spaces.
Whether you have a wooden backyard shed, a compact metal storage unit, or a small garden workshop, the following ideas will help you create a practical storage system without sacrificing valuable floor space.
Why Proper Garden Tool Storage Matters in Small Sheds
A well-organized garden shed does more than improve appearance. It protects equipment, reduces clutter, and makes everyday gardening tasks easier.
When garden tools are left scattered across the floor, they can become damaged, difficult to find, or even dangerous. Moisture can also affect metal equipment, wooden handles, batteries, and other gardening accessories.
Effective storage offers several advantages:
- Makes frequently used gardening tools easier to access.
- Protects equipment from moisture and unnecessary damage.
- Creates more usable floor space.
- Reduces tripping hazards and accidental injuries.
- Simplifies cleaning and seasonal maintenance.
- Helps homeowners identify missing or damaged tools.
The objective is to create a storage arrangement that works with your shed’s dimensions and your gardening habits.
Plan Your Small Shed Storage Layout Before Organizing
Before installing shelves or buying storage accessories, evaluate the space you already have.
Measure the shed’s width, depth, and height. Examine the available wall surfaces, the door’s opening direction, and the location of windows or ventilation openings.
Next, remove unnecessary items and group your gardening equipment into categories. Separate long-handled tools, hand tools, watering equipment, seasonal supplies, and power tools.
Think about which items you use most frequently. Everyday tools should remain near the entrance, while seasonal equipment can occupy higher shelves or less accessible locations.
A useful shed layout normally includes three areas:
- Vertical storage: Wall-mounted holders for rakes, spades, and long-handled equipment.
- Compact shelving: Narrow shelves or containers for smaller gardening accessories.
- Open floor space: A clear central area for movement and access.
Planning these areas before installation helps prevent overcrowding and unnecessary purchases.
17 Garden Tool Storage Ideas for Small Sheds
The following practical solutions can help transform limited storage space into an organized and functional gardening area.
1. Install Wall-Mounted Garden Tool Racks
Wall-mounted tool racks are among the most effective ways to organize gardening equipment in compact sheds.
Instead of leaning several rakes and shovels against a corner, install a sturdy rack with individual holders for each tool.
Horizontal rails with hooks or adjustable grips are particularly useful because they accommodate different handle sizes.
Position frequently used equipment at a comfortable height, making it easy to remove and return.
Choose racks designed for the weight of your tools and secure them to suitable framing or structural supports. Thin shed panels alone may not support heavy equipment.
This simple improvement keeps long-handled tools organized while freeing the floor for larger items.
2. Use Pegboards for Flexible Tool Organization
Pegboards provide a customizable storage solution for smaller gardening tools.
They are especially useful for organizing pruning shears, garden scissors, hand trowels, gloves, measuring tapes, and lightweight accessories.
Install a weather-resistant pegboard on an available wall and arrange suitable hooks, holders, and small baskets according to your needs.
One advantage is flexibility. As your gardening equipment collection changes, you can rearrange the hooks without rebuilding the entire storage system.
Consider outlining tool positions or adding simple labels so that every item has a designated place.
In damp sheds, choose corrosion-resistant hardware and avoid materials that deteriorate with prolonged moisture exposure.
3. Build Narrow Shelves Along Unused Walls
Traditional shelving units can consume too much space in a narrow shed. Slim wall-mounted shelves offer a more practical alternative.
Install shallow shelves along an unused wall to organize lightweight containers, seed trays, plant labels, and small accessories.
Adjust shelf depth according to the available walkway. A narrow shelf that leaves enough room to move safely is more useful than a deep shelf that blocks access.
Store heavier objects on lower shelves to reduce the risk of falling items or instability.
Use stackable containers to improve organization, but avoid stacking them so high that they become difficult to remove safely.
Properly positioned shelves help maximize storage capacity without making the shed feel cramped.
4. Turn the Shed Door Into Extra Storage
The inside of a shed door is frequently overlooked, despite offering valuable storage space.
Lightweight door-mounted organizers can hold garden gloves, string, small hand tools, cleaning cloths, and plant labels.
Choose shallow organizers that do not interfere with the doorframe or surrounding shelves.
Before installing anything, check the door’s construction and hardware. Lightweight items are best because excessive weight can strain hinges and cause alignment problems.
Avoid hanging sharp or heavy tools where they might fall when the door opens.
A carefully designed door organizer can reduce clutter on work surfaces while keeping regularly used accessories within reach.
5. Make Use of High Wall Space
Many small sheds have unused wall space above standard shelving.
This area can be useful for seasonal supplies, lightweight watering accessories, or items that are not required every week.
Install small upper shelves or hooks where the shed’s structure can safely support them.
However, accessibility should remain a priority. Avoid placing heavy objects overhead or arranging items where retrieving them requires unsafe stretching.
Store lightweight, rarely used equipment at higher levels while keeping everyday essentials closer to waist or shoulder height.
Using the full height of a shed can significantly improve organization without expanding its footprint.
Compact Storage Solutions for Gardening Accessories
Small gardening accessories often create more visible clutter than large tools because they are easily scattered across shelves and worktops.
The following ideas help keep smaller items grouped and accessible.
6. Organize Small Items With Clear Storage Bins
Transparent storage bins make it easier to identify gardening supplies without opening every container.
Group similar items, such as plant markers, spare gloves, irrigation connectors, hand tools, and empty seed trays.
Choose containers that fit your shelving dimensions rather than buying oversized boxes.
Stackable bins can save space, but frequently used supplies should remain easy to reach without moving several containers.
Add labels to identify the contents, especially when multiple bins look similar.
For moisture-sensitive supplies, select appropriate sealed containers and ensure items are completely dry before storage.
This system makes small garden sheds more manageable and reduces the time spent searching for everyday accessories.
7. Create a Dedicated Storage Area for Long-Handled Tools
Rakes, hoes, brooms, and shovels can occupy considerable space when stored randomly.
A dedicated long-handled tool station solves this problem by keeping equipment together.
Depending on the layout, use a wall-mounted rail, upright tool holder, or narrow floor-standing rack.
Position similar tools together while allowing enough separation to prevent handles and tool heads from becoming tangled.
For example, frequently used rakes and spades can remain near the entrance, while less frequently used equipment can be positioned toward the rear.
Keep sharp edges protected and avoid placing projecting handles across walking areas.
A designated tool station improves accessibility and makes equipment easier to return after gardening.
8. Use Magnetic Strips for Suitable Metal Tools
Magnetic tool strips can help organize certain lightweight metal gardening accessories.
They work particularly well for compatible small tools that would otherwise disappear inside crowded drawers.
Install a suitable magnetic holder above a small workbench or along a secure wall section.
Check that the strip provides sufficient holding strength for each item. Not every metal tool is magnetic, and heavy or sharp equipment may be unsuitable.
Keep exposed cutting edges away from walkways and areas children can reach.
Magnetic storage works best as a supplementary organization method alongside shelves, racks, and containers.
9. Add Stackable Drawers for Tiny Accessories
Small accessories such as plant clips, replacement fittings, screws, and irrigation components are easy to misplace.
Compact stackable drawers provide a convenient solution for storing these items separately.
Choose drawers with dividers so that similar materials remain organized.
Arrange the most frequently needed accessories in upper or middle drawers, while seasonal supplies can go lower down.
If drawers are installed on shelving, ensure the unit is stable and that pulling out a drawer cannot tip it forward.
This arrangement is especially useful for gardeners who maintain irrigation systems, raised beds, or container gardens.
10. Install a Fold-Down Work Surface
A fold-down workbench can provide temporary workspace without permanently occupying valuable floor space.
Attach a suitable folding surface to a structurally sound wall and use it for sorting tools, preparing containers, or organizing gardening materials.
When the task is complete, fold the surface away.
Before installation, check the wall’s strength, the bracket’s rated load, and the clearance needed to operate the work surface.
Avoid using lightweight folding benches for heavy machinery or activities that require substantial force.
For small sheds that occasionally function as gardening workstations, this feature offers useful flexibility.
Creative Ways to Use Overlooked Shed Space
Once the main walls and shelves are organized, look for smaller areas that could offer additional storage.
11. Convert Empty Corners Into Vertical Storage
Corners often become collection points for awkward items.
Instead of leaving them cluttered, install a narrow corner shelf or an upright holder designed for long-handled gardening equipment.
Corner shelves can accommodate lightweight watering accessories, empty pots, or gardening containers.
An upright rack may be more appropriate for brooms, narrow spades, and similar tools.
Choose a solution that does not obstruct the shed entrance or prevent doors and cabinets from opening fully.
A well-designed corner organizer turns an overlooked area into useful storage without occupying the central floor.
12. Hang Lightweight Equipment From Ceiling Supports
Where adequate structural support and clearance exist, overhead storage can accommodate lightweight, infrequently used gardening equipment.
Suitable items may include empty hanging baskets, lightweight plant supports, or compact seasonal accessories.
Use hardware rated for the intended load and fasten it to appropriate structural members.
Avoid suspending heavy tools, fuel containers, or sharp objects overhead.
Check that hanging items do not interfere with door movement, lighting, or comfortable standing height.
Overhead storage is not suitable for every shed, particularly structures with low ceilings or lightweight roof framing.
When installed correctly, it can provide additional storage without cluttering the walls.
13. Use a Rolling Cart for Frequently Used Supplies
A compact rolling cart can make gardening supplies easier to transport between the shed and outdoor work areas.
Choose a narrow cart with stable wheels and multiple storage levels.
Store hand tools, gloves, watering attachments, and small planting accessories on separate tiers.
A cart is particularly useful when you regularly move supplies to raised beds, vegetable plots, or patio planters.
Make sure the wheels are suitable for the shed floor and outdoor surfaces, and use wheel locks where provided.
Select a cart that can fit inside the shed without blocking access to larger equipment.
14. Organize Plant Pots With Vertical Holders
Empty plant pots can quickly occupy large amounts of shelving space.
Organize them by size and material, nesting compatible pots together whenever practical.
Use narrow racks or designated shelves for lightweight plastic containers and seed trays.
Terracotta and ceramic pots are heavier and more fragile, so they should generally remain on stable, lower shelves.
Clean and dry reusable containers before storing them to reduce accumulated dirt and moisture.
For gardeners working with limited outdoor space, keeping pots organized also makes seasonal planting projects easier to manage.
For more ideas about arranging container plants and practical outdoor spaces, explore these patio decorating ideas for summer.
Keep Garden Equipment Protected and Accessible
Organizing tools is only part of effective shed storage. The right conditions also help preserve equipment and reduce maintenance problems.
15. Create a Separate Storage Zone for Power Tools
Electric hedge trimmers, cordless drills, and other gardening equipment need more protection than basic hand tools.
Allocate a dry, secure shelf or storage cabinet for power tools and their accessories.
Use protective cases where available and avoid stacking heavy equipment on delicate components.
Rechargeable batteries should be stored according to manufacturer guidance, protected from extreme temperatures, moisture, and physical damage.
Do not charge batteries in damp conditions or leave charging equipment unattended contrary to manufacturer instructions.
Store petrol, pesticides, and other hazardous products separately in accordance with their labels and applicable local safety requirements.
Clear separation helps protect equipment and makes shed organization safer.
16. Protect Metal Tools From Rust and Moisture
Garden sheds are frequently exposed to changing temperatures, condensation, and humidity.
These conditions can affect metal blades, hinges, fasteners, and wooden handles.
Clean soil from gardening tools after use, remove excess moisture, and allow equipment to dry before storage.
Inspect metal surfaces for corrosion and maintain them according to the tool manufacturer’s recommendations.
Improve ventilation where possible, repair leaks, and keep stored equipment away from persistently damp surfaces.
Avoid sealing wet tools inside airtight containers because trapped moisture may accelerate deterioration.
Protecting equipment from moisture can reduce repairs and help tools remain usable for longer.
17. Build a Seasonal Garden Tool Storage System
Gardening equipment requirements change throughout the year.
Spring often involves planting tools, compost accessories, and seed trays, while autumn may require rakes, pruning tools, and cleanup equipment.
A seasonal storage system keeps your current gardening essentials accessible.
Move less frequently used supplies to higher shelves or designated storage bins when the season changes.
Label seasonal containers clearly and avoid storing items you no longer need.
Gardeners preparing for colder weather can also consult this winter vegetable garden planning guide to coordinate seasonal planting tasks and equipment.
Regular seasonal adjustments prevent unnecessary clutter from building up.
Best Small Garden Shed Layout for Maximum Storage
A practical shed layout should prioritize accessibility rather than filling every available surface.
For a narrow rectangular shed, consider organizing the interior as follows:
- Entrance area: Keep frequently used hand tools and gloves close to the door.
- One side wall: Install vertical racks for rakes, spades, and long-handled equipment.
- Opposite wall: Use shallow shelves, a pegboard, or compact storage drawers.
- Back wall: Place seasonal equipment and appropriately secured storage containers.
- Floor area: Reserve sufficient clearance for safe movement and larger equipment.
The ideal layout depends on your shed’s measurements, door position, and the equipment you own.
If you store a lawn mower or wheelbarrow, measure its full dimensions, including the clearance needed to remove it.
Avoid permanent fixtures that make essential equipment difficult to access.
A balanced arrangement is often more practical than maximizing storage capacity at the expense of movement.
Budget-Friendly DIY Garden Tool Storage Ideas
Improving a small garden shed does not always require expensive storage systems.
Many effective solutions can be made from materials already available at home.
For example, a securely mounted timber board fitted with suitable hooks can create a basic tool rack.
Clean, reusable containers can help organize lightweight gardening accessories.
Offcuts of suitable wood may be used to construct narrow shelves or simple dividers.
Other affordable improvements include reusable labels, wall hooks, small baskets, and compact storage boxes.
When reusing materials, check their condition carefully. Damaged timber, weak fasteners, or unstable shelving can create hazards.
Focus your budget on secure mounting hardware and reliable supports before purchasing decorative organizers.
For additional practical home improvement inspiration, explore zingyzon.com, where readers can discover useful home and garden guides.
Common Small Shed Organization Mistakes to Avoid
Even a carefully planned storage system can become inconvenient if a few common mistakes are overlooked.
One frequent mistake is installing shelves that are too deep. Although they offer more storage capacity, oversized shelves can reduce walking space.
Another problem is placing frequently used tools behind seasonal equipment.
Overloading wall-mounted racks or attaching heavy shelving to weak panels can also create safety concerns.
Other mistakes include:
- Mixing wet and dry equipment inside closed containers.
- Storing heavy objects on unstable upper shelves.
- Blocking ventilation openings with storage boxes.
- Keeping unnecessary or broken gardening equipment.
- Leaving sharp tools exposed in accessible areas.
- Ignoring the space required to open the shed door.
The most effective organization system is one that remains easy to use during regular gardening activities.
How to Keep a Small Garden Shed Organized Year-Round
Organizing a shed once is helpful, but maintaining the system delivers the greatest long-term benefit.
After every gardening session, return tools to their designated positions.
Remove soil from equipment before putting it away, and inspect damaged handles or fittings.
Once a month, review shelves and containers for unnecessary clutter.
Seasonal cleaning provides an opportunity to identify duplicate supplies, damaged equipment, and tools that require maintenance.
A simple routine can prevent a well-organized shed from becoming overcrowded again.
Good storage habits are just as important as shelves, hooks, and racks.
Frequently Asked Questions
1. What is the best way to store garden tools in a small shed?
Wall-mounted racks, pegboards, and narrow shelving are effective because they keep tools accessible while preserving floor space.
2. How do you organize a shed with very limited space?
Use vertical walls, door organizers, compact storage bins, and corner shelves. Keep frequently used tools near the entrance.
3. Can garden tools be stored vertically?
Yes. Rakes, shovels, brooms, and similar tools can be stored vertically using properly secured holders designed for their size and weight.
4. How can I organize garden tools without spending much money?
Use affordable hooks, reused containers, simple timber racks, and labeled bins. Prioritize secure installation and practical accessibility.
5. How do I prevent garden tools from rusting inside a shed?
Clean and dry tools after use, improve ventilation, repair moisture leaks, and maintain metal surfaces according to manufacturer guidance.
6. What should I avoid storing in a small garden shed?
Avoid unsuitable hazardous materials, damaged batteries, and products that require controlled temperatures. Follow manufacturer instructions and local storage regulations.
Conclusion
The best garden tool storage ideas for small sheds focus on making limited space more practical, accessible, and safe. Wall-mounted racks, pegboards, narrow shelves, stackable containers, and seasonal organization systems can improve even the smallest garden storage area. Start by removing unnecessary clutter, create dedicated zones for different equipment, and install storage solutions that suit your shed’s structure. With thoughtful planning and regular maintenance, a compact shed can remain organized and functional throughout the year.
Keep Exploring Zingyzon.com
Read more Zingyzon SEO, digital marketing, online earning, business, and technology guides for Australia, USA, and global readers.