
Indoor Seed Starting Setup for Beginners
Starting plants from seed can feel complicated when you see shelves filled with grow lights, heating mats, plastic domes, trays, […]
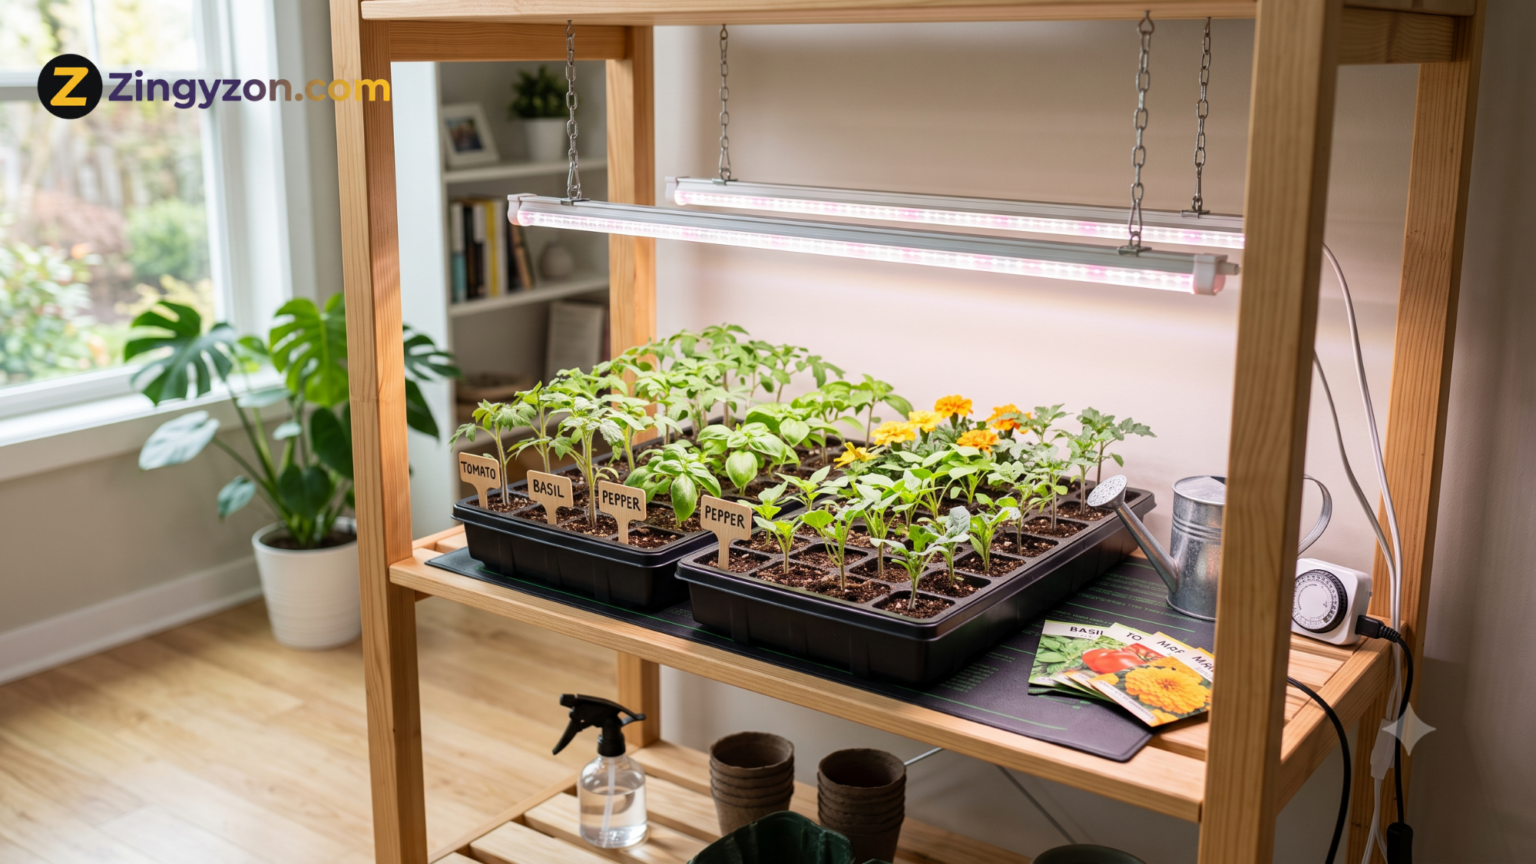
Starting plants from seed can feel complicated when you see shelves filled with grow lights, heating mats, plastic domes, trays, timers, and gardening tools. Fortunately, a successful indoor seed starting setup for beginners does not need to be expensive or highly technical.
At its simplest, you need suitable containers, a lightweight seed-starting mix, reliable light, gentle warmth, consistent moisture, and enough airflow to keep young plants healthy. Once these basic conditions are controlled, starting vegetables, herbs, and flowers indoors becomes much easier.
Growing from seed also gives you access to more plant varieties than you may find at a local garden center. You can start tomatoes, peppers, lettuce, herbs, flowers, and many other plants before outdoor conditions are warm enough.
This guide explains how to build your first setup, sow seeds correctly, care for emerging seedlings, prevent common problems, and prepare young plants for life outdoors.
What Is an Indoor Seed Starting Setup?
An indoor seed starting setup is a controlled growing area where seeds are germinated and raised before being transplanted into larger pots or an outdoor garden.
The setup may be as small as one tray under a tabletop grow light or as large as a multi-level shelving unit with several lights. Beginners do not need a professional greenhouse system. A small shelf, spare table, countertop, utility room, or unused corner can work well.
The purpose of the setup is to provide the conditions seeds need at different stages. During germination, seeds mainly need moisture and the correct temperature. After sprouting, seedlings need strong light, airflow, careful watering, and room for their roots to develop.
Why Start Seeds Indoors?
Indoor seed starting allows you to begin growing several weeks before the outdoor planting season. This can be especially useful in areas with cold winters or short growing seasons.
It also provides greater control over the early stages of plant growth. Outdoor seeds may be affected by heavy rain, cold soil, birds, insects, weeds, or sudden temperature changes. Indoors, you can manage the growing environment more carefully.
Other benefits include:
- Access to a wider selection of plant varieties
- Lower cost per plant after purchasing basic equipment
- Better control over soil, moisture, temperature, and light
- An earlier start for slow-growing vegetables and flowers
- The satisfaction of raising plants from the seed stage
- The ability to grow extra plants for family or friends
You can explore more practical home and gardening ideas on Zingyzon.com.
Essential Supplies for Starting Seeds Indoors
You do not need every seed-starting product sold in gardening stores. Begin with the essentials and expand your setup after gaining experience.
Seed-Starting Containers
Commercial cell trays are convenient because they keep seedlings organized and make watering easier. You can also use small pots, soil blocks, recycled nursery containers, or clean food containers.
Every container must have drainage holes. Without drainage, excess water collects around the roots and increases the risk of rot, mold, and seedling disease.
A waterproof tray beneath the containers will protect your shelf or table and allow you to water from below.
Seed-Starting Mix
Use a lightweight, clean seed-starting mix instead of ordinary outdoor garden soil. Seed-starting mixes are designed to hold moisture while allowing air to reach developing roots.
Garden soil can become heavy and compact inside small containers. It may also contain weed seeds, insects, or organisms that are unsuitable for delicate seedlings.
Before filling the trays, add a small amount of water to the mix. It should feel evenly moist but not dripping wet. Pre-moistening prevents the dry mix from floating or shifting after seeds are planted.
Seeds
Choose fresh seeds from a reliable source and read each seed packet carefully. The packet normally provides information about sowing depth, germination time, spacing, temperature preferences, and when to start the seeds.
For your first attempt, consider easy crops such as:
- Lettuce
- Kale
- Broccoli
- Basil
- Marigolds
- Zinnias
- Tomatoes
- Cucumbers
Peppers and some perennial flowers can also be grown indoors, but they may take longer to germinate.
Grow Lights
A bright window can help, but window light is often uneven or insufficient during winter and early spring. Seedlings that do not receive enough light become tall, thin, pale, and weak. This condition is commonly called legginess.
A basic LED grow light or full-spectrum shop light can provide more consistent coverage. Choose a fixture that illuminates the entire tray rather than a small area in the center.
The light should be adjustable so it can be raised as the seedlings grow. Always follow the manufacturer’s recommended hanging distance because brightness and heat levels vary between fixtures.
Timer
A timer is an inexpensive addition that automatically switches the grow lights on and off. Seedlings generally perform well with a long period of light followed by several hours of darkness.
A consistent schedule is better than manually turning the lights on at different times each day. Connect your grow light to the timer and check it occasionally to make sure the schedule has not been changed accidentally.
Heat Mat
A seedling heat mat is helpful but not essential for every plant. Warm-season crops, particularly peppers, eggplants, and tomatoes, often germinate more reliably when the growing mix remains comfortably warm.
Cool-season crops such as lettuce, kale, and broccoli usually do not require as much bottom heat.
Place the mat beneath the tray rather than directly inside it. Remove the tray from the heat mat after most seeds have germinated unless the room is unusually cold. Excessive warmth after sprouting can encourage weak growth.
Humidity Cover
A clear humidity dome helps prevent the seed-starting mix from drying during germination. Plastic wrap can provide a temporary alternative, but it should not touch the soil surface.
Remove the cover as soon as seedlings begin emerging. Keeping seedlings covered for too long traps excessive moisture and reduces airflow, which can encourage mold and disease.
Labels and Marker
Many seedlings look similar when they first emerge. Label each row or container with the plant name, variety, and sowing date.
Use a waterproof marker so the information does not disappear during watering. Keeping simple records will also help you improve your timing and methods next season.
Choosing the Best Location
Select an area where temperature, lighting, and water can be managed safely. The space should be close to an electrical outlet but protected from splashes and standing water.
Avoid placing trays beside heating vents, radiators, fireplaces, or frequently opened exterior doors. These locations can cause sudden temperature changes or dry the growing mix too quickly.
Your setup should also be easy to inspect. Seed trays can change quickly, particularly during germination. A convenient location makes it more likely that you will notice dry soil, emerging seedlings, mold, or lighting problems early.
Protect the floor and furniture with waterproof trays or a washable covering. Water and loose growing mix can create a mess even when you work carefully.
How to Build an Indoor Seed Starting Setup
Step 1: Clean the Equipment
Wash previously used trays and pots before planting. Remove old soil, roots, mineral deposits, and plant material.
Starting with clean equipment reduces the chance of transferring pests or diseases to the new seedlings. Allow everything to dry before filling the containers.
Step 2: Arrange the Shelf and Light
Place the waterproof tray on a stable shelf or table. Install the grow light above it and make sure the fixture cannot fall.
Test the height adjustment before planting. You should be able to raise the light gradually as the plants grow. Plug the light into a timer and confirm that the timer works correctly.
Keep electrical connections above floor level and away from water. Do not overload outlets or use damaged extension cords.
Step 3: Fill the Containers
Add pre-moistened seed-starting mix to each cell or pot. Fill the containers close to the top without tightly compressing the mix.
Tap the tray lightly against the table to settle the material. Add more mix if large gaps appear, but keep the surface loose enough for roots to grow easily.
Step 4: Sow the Seeds
Check the seed packet for the recommended planting depth. A common beginner mistake is burying seeds too deeply.
Make a small hole, place the seed inside, and cover it lightly. Very small seeds may only need to be pressed onto the surface.
You can plant two seeds in each cell when germination is uncertain. If both grow, keep the stronger seedling and cut the weaker one at soil level. Pulling it out may disturb the roots of the plant you want to keep.
Step 5: Water Gently
After sowing, water gently enough that the seeds are not washed away. A spray bottle can help with tiny surface-sown seeds, but repeated misting should not be your only watering method after seedlings become established.
Bottom watering is usually easier and more consistent. Add a shallow layer of water to the tray and allow the mix to absorb it through the drainage holes. Remove any water that remains after the growing mix is evenly moist.
The goal is moist soil, not permanently saturated soil.
Step 6: Cover and Provide Warmth
Place the humidity dome over the tray and move it to the recommended germination temperature. Use a heat mat only when the crop benefits from additional warmth.
Check the tray daily. A covered tray can remain moist for several days, but small containers can also dry unexpectedly in a warm room.
The moment you see green shoots, prepare to remove the dome and place the seedlings under strong light.
Step 7: Move Seedlings Under the Light
Position the grow light according to its instructions. The fixture should be close enough to produce compact growth without overheating or bleaching the leaves.
Run the light on a consistent daily schedule. Raise it whenever the tops of the seedlings approach the fixture.
Rotate the tray occasionally if one side receives stronger light. However, a properly sized overhead light should provide relatively even coverage.
Step 8: Introduce Airflow
Gentle airflow helps reduce surface moisture and encourages stronger stems. A small fan placed several feet away can move the air around the seedlings.
Use the lowest setting and avoid blasting young plants continuously. The leaves should move slightly rather than bend sharply.
Airflow cannot correct overwatering, but it can make the environment less favorable for mold and certain seedling diseases.
Step 9: Thin and Feed the Seedlings
When more than one seedling grows in a cell, select the strongest plant. Cut the extras at the soil surface with clean scissors.
Seed-starting mix may contain little or no fertilizer. After seedlings develop their first true leaves, you can begin applying a diluted, seedling-safe liquid fertilizer when needed.
The first leaves that appear are seed leaves. True leaves emerge afterward and begin to resemble the normal leaves of the mature plant.
Avoid strong fertilizer. Young roots are sensitive, and excessive feeding can damage them.
How Often Should You Water Seedlings?
There is no fixed watering schedule that works for every setup. Container size, room temperature, airflow, plant size, and growing mix all affect how quickly water is used.
Check the trays daily by looking at the soil surface and lifting the containers. A lighter tray usually indicates that water is needed.
Water when the mix is beginning to dry, but do not wait until seedlings wilt severely. Bottom watering encourages the roots to grow downward and keeps the leaves drier.
Never leave the pots sitting in water for long periods. Constant saturation reduces oxygen around the roots and may lead to yellow leaves, slow growth, algae, or root problems.
When Should You Start Seeds Indoors?
Work backward from your expected outdoor planting date. Seed packets commonly indicate how many weeks before the last frost the seeds should be started.
Some fast-growing plants only need a few weeks indoors. Peppers, onions, and certain flowers may need a much earlier start.
Starting too early creates oversized, crowded seedlings that are difficult to maintain. Starting too late may reduce the benefit of indoor growing.
Keep a simple calendar showing:
- The crop and variety
- The sowing date
- Expected germination period
- Outdoor transplant date
- Actual germination results
Your local frost dates and seasonal weather patterns should guide the final timing.
A Budget-Friendly Beginner Setup
A beginner can create an effective setup without purchasing a large indoor growing system.
Start with one reusable tray, a simple LED shop light, a timer, seed-starting mix, labels, and a small selection of seeds. Use a sturdy existing shelf instead of buying a specialized growing rack.
A heat mat can be added later if you plan to grow warm-season crops or your room remains cold.
Reusable containers reduce long-term costs, but free containers can also work when they are thoroughly cleaned and provided with drainage holes. Avoid containers that are too shallow or become soft when wet.
Spend your limited budget on dependable lighting and suitable growing mix before buying decorative accessories.
Common Indoor Seed Starting Mistakes
Insufficient Light
Weak light produces stretched seedlings with thin stems. Move the light closer when permitted by the manufacturer, increase the lighting duration, or use a fixture that covers the complete tray.
Overwatering
More seedlings are harmed by constantly wet soil than by a carefully managed watering routine. Allow some air to return to the mix between waterings.
Leaving the Humidity Dome On
The dome is useful during germination but should be removed once seedlings emerge. Young plants need airflow and should not remain inside a wet, enclosed environment.
Planting Too Deeply
Small seeds may not have enough stored energy to reach the surface when buried too deeply. Follow the instructions on the packet.
Starting Too Many Seeds
It is tempting to fill several trays, but every seedling will eventually need light, water, space, and possibly a larger pot. Start with a manageable number of plants.
Ignoring Labels
Unlabeled seedlings are difficult to identify. This becomes particularly confusing when several varieties of the same vegetable have been planted.
Using Heavy Garden Soil
Dense outdoor soil may restrict root development and hold too much water in small cells. Use a product intended for seed starting.
After transplanting, you can improve the outdoor growing area by learning about the best ingredients for garden soil.
Potting Up Seedlings
Some plants outgrow their seed cells before outdoor conditions are suitable. When roots fill the container or circle around the drainage holes, move the plant into a slightly larger pot.
Handle seedlings by their leaves rather than squeezing the delicate stem. Fill the new container with suitable potting mix, make a planting hole, and transfer the root ball carefully.
Do not move a tiny seedling into an excessively large pot. A large volume of wet mix can remain damp for too long around a small root system.
Hardening Off Before Transplanting
Indoor-grown seedlings are not immediately prepared for direct sun, wind, rain, and changing outdoor temperatures. They need a gradual adjustment period called hardening off.
Begin about one to two weeks before transplanting. Place the seedlings outdoors in a sheltered, shaded location for a short period. Bring them indoors before temperatures fall or conditions become harsh.
Increase their outdoor time and sunlight exposure gradually each day. Continue checking the moisture level because small pots can dry quickly outdoors.
Transplant on a mild, cloudy day when possible. Water the seedlings before and after planting.
Flowering plants and herbs can later become part of a container or pollinator garden for small spaces.
Beginner Seed Starting Checklist
Before sowing, confirm that you have:
- Containers with drainage holes
- Waterproof bottom trays
- Fresh seed-starting mix
- Suitable seeds
- Plant labels
- A grow light
- An adjustable light support
- A timer
- A safe electrical connection
- A watering container
- A planting calendar
- Optional humidity dome, fan, and heat mat
Final Thoughts
The best indoor seed starting setup for beginners is not necessarily the largest or most expensive. It is the setup you can monitor consistently.
Begin with one or two trays and a few easy crops. Focus on providing clean containers, loose growing mix, suitable warmth, strong light, careful watering, and gentle airflow.
Observe how the plants respond instead of following a rigid routine. Seedlings communicate problems through their growth. Tall stems suggest weak light, constantly wet soil suggests excessive watering, and crowded roots indicate that larger containers may be needed.
With a little practice, indoor seed starting becomes an enjoyable and economical way to prepare vegetables, herbs, and flowers for the growing season.
Frequently Asked Questions
What do beginners need to start seeds indoors?
Beginners need seeds, containers with drainage, waterproof trays, seed-starting mix, labels, water, a grow light, and a timer. A humidity dome, small fan, and heat mat are helpful additions but are not required for every crop.
Can I start seeds indoors without a grow light?
You can use a very bright window, but seedlings may lean toward the glass or become thin when daylight is limited. A grow light provides more consistent coverage and is usually more reliable for winter or early-spring seed starting.
Can I use regular potting soil for seed starting?
Fine-textured potting mix may work, but a dedicated seed-starting mix is generally lighter and easier for small roots to grow through. Avoid heavy garden soil because it may compact and drain poorly inside small cells.
How many seeds should I plant in each cell?
Plant one or two seeds per cell for most vegetables and flowers. When both seeds germinate, keep the strongest seedling and cut the weaker one at the soil surface.
How deep should seeds be planted?
Planting depth depends on the seed. Follow the seed packet instructions. Very small seeds are often sown near the surface, while larger seeds can usually be planted more deeply.
Do all seeds need a heating mat?
No. Heat mats are most useful for crops that prefer warm soil, such as peppers, tomatoes, and eggplants. Cool-season crops may germinate successfully at normal indoor temperatures.
When should I remove the humidity dome?
Remove the dome when the first seedlings begin to emerge. Leaving it on after germination can trap excessive moisture and restrict airflow.
How many hours should grow lights stay on?
Many seedlings benefit from approximately 14 to 16 hours of light followed by a dark period. Light intensity and plant type also matter, so monitor the seedlings and follow the grow-light manufacturer’s guidance.
Why are my seedlings tall and thin?
Tall, thin seedlings usually indicate insufficient light. Move the fixture closer if it is safe, increase light coverage, and make sure the plants are receiving a consistent daily lighting period.
When should seedlings be transplanted outdoors?
Transplant timing depends on the plant and local weather. Wait until the crop can tolerate outdoor temperatures, the risk of damaging frost has passed where applicable, and the seedlings have been hardened off gradually.
What is damping off?
Damping off is a seedling problem that can cause young stems to weaken near the soil surface and collapse. Reduce the risk by using clean containers, fresh growing mix, proper drainage, gentle airflow, and careful watering.
Should seedlings be fertilized?
Seeds contain stored energy for early growth, so fertilizer is not normally needed immediately. Begin using a diluted seedling fertilizer after true leaves develop if the growing mix does not already contain nutrients.
Keep Exploring Zingyzon.com
Read more Zingyzon SEO, digital marketing, online earning, business, and technology guides for Australia, USA, and global readers.